Showing posts with label breathing. Show all posts

Friday, February 15, 2013

Day 230- AH Arms


This exercise isolates the movement of shoulder extension while lying prone


To do this exercise you will need a mat.  Start by lying on your belly with your legs lengthened long beneath you.  Inhale to prepare and then exhale as you slide your shoulder blades down your back and lift your arms into the air.  Inhale as you lower your arms to the ground and then exhale again as you lift your arms. Repeat 8-10 times

Things to think about
When you slide your shoulder blades down your back be sure that you also widen your collarbones.

As you are doing this exercise imagine movement your shoulder blades and collarbones moving around your ribcage.  Imagine fluid movement that is free from the tension of the upper trapezius muscles. 

Saturday, November 24, 2012

Day 147-Sniffing Rib Breath


This exercise is a classic pilates breath pattern, that is used in the classic pilates exercise The Hundred, but it also is a great way to wake up the diaphragm so that breath capacity can be increased and the spine can benefit from the length inspired by movement in the diaphram.
To do this exercise you will need a mat (but this pattern can be performed in any position).  For the purposes of this blog post you will start by lying on your back with your knees bent and your feet planted on the ground.  Take a few breaths in through the nose and out through the mouth just to see how much movement there is in your torso.  After a few breaths, begin taking air in through the nose in five staccato-like inhales (sniffs), and then you will breath out through your mouth with five staccato-like exhales.  Continue repeating for ten breath cycles.  You will take five short breaths in, and five short breaths out.  Notice what your are feeling at the base of your ribcage during these ten breath cycles, and then at the end allow your breath to return to normal and notice if there is a difference in your breath capacity.
Things to think about
This is a breath pattern and your focus should be on the inhale and the exhale, while you may notice some work in the abdominals do not make this the focus of the exercise. 
This breath can be very energizing.  If you feel lethargic or lackadaisical, try this breath for some added energy.

Thursday, September 27, 2012

Day 89- Ribs/Arms


This exercise is intended to separate the movement of the arms from the movement of the ribcage, so that the back is protected.
 
To do this exercise you will need a mat.  Start by lying on your back with your knees bent and your feet planted on the ground.  Your hands will rest next to your thighs.  Inhale into the ribs as you begin lifting your arms up above your chest, and then exhale to send the ribs towards the pelvis as your arms are descending to the ground behind your head. Inhale into the ribs as you bring the arms back by your side and then exhale again as you lift the arms above your chest before bringing them to the ground behind your head.
 
Things to think about
This exercise is an important protector for the back.  The tendency will be to let the ribs lift away from the floor as your arms go above your head.  The rib breath will help alleviate this issue.  As you exhale, if you concentrate on getting all of the air out of your lungs then the ribs will be more likely to stay connected to the ground.

Wednesday, September 26, 2012

Day 88- The W


This exercise is also intended to open the chest, but it concentrates on deeper muscles across the front of the chest.
 
To do this exercise you will need a mat.  Start by lying on your back with your knees bent and your feet planted in the floor.  Your arms are in what is called the “Y” position. In this position your arms are out to the side but slightly above your shoulders as if your spine and your arms are making a “Y” on the ground.  Inhale to prepare and then exhale as you bend your elbows sliding the elbows along the floor towards the ribs.  This is the “W” position.  Inhale as you straighten your arm and exhale as you bend your elbows again.
 
Things to think about
It is important to keep your forearm parallel to the floor.  The tendency will be to let the elbows drop and your hands to lift.  Be sure to keep the chest open so that the arm is even. 
 

Tuesday, September 25, 2012

Day 87-Snow Angels


This exercise is intended to open the chest and widen the collarbones, which will prepare the shoulder girdle for some abdominal strengthening work
To do this exercise you will need a mat.  Start by lying on your back with your knees bent and your feet planted in the ground.  Your hands will be by your sides with your palms facing the ceiling.  Inhale as you begin sliding your arms along the ground as if you are making angel wings in the snow.  As your arms are becoming even with your shoulders, exhale to continue the slide.  Once you get to your full range of motion then inhale as you start to bring the arms back and then exhale to return to the starting position
Things to think about
It is important to keep the collarbones open during this exercise.  As your arms are sliding along the floor be sure to be aware of the shoulder blades keeping them as flat to the floor as possible.

Monday, September 3, 2012

Day 65- Psoas Stretch with Pelvis on Ball


This exercise is intended to increase the stretch at the front of the hip.  By elevating the pelvis the position of this exercise can increase the length found at the front of the hip.
To do this exercise you will need a mat and a soft ball.  Start by lying on your back with the soft ball underneath your pelvis.  Then hug one leg towards your chest, and stretch the opposite leg long beneath your body.  Be sure to reach the heel towards the floor.  Continue your breath as you are reaching your leg long away from you.  Keep your heel connected to the ground.  To continue opening the hips along different fascial lines you may also do ankle circles with your heel connected to the ground.  Repeat with the other leg reaching out long beneath you.
Things to think about
The soft ball provides a certain amount of support for the pelvis, but you want to be sure that the back remains neutral as opposed to over arching.  If you feel like your spine is bending too much then hollow out the abdominals and try to pull the pelvis away from the legs.

Sunday, September 2, 2012

Day 64- Easy Psoas Stretch with Ankle Circles


This exercise is intended to continue the process of opening up the hips.  The ankle circles allow you to ease the front of the hips through several fascial planes at the top of the thigh
 
To do this exercise you will need a mat.  Start by lying on your back with one leg hugged towards your chest and the opposite leg lengthened long along the floor.  Begin breathing being sure that your heel is connected to the floor.  Then as you continue breathing circle the ankle around the axis of the heel.  Feel how the movement of the ankle can reverberate through the lower leg, the thigh, and into the hip joint.  Do about five ankle circles in each direction and then switch legs.  Keep your breath continuous and full.
 
Things to think about
As with all Pilates exercises it is important to be mindful of the breath in this exercise.  Especially because the Psoas which runs along the front of the spine is connected fascially to the diaphragm and taking full deep breaths can aid in the success of the exercise.
 
Also keep the heel connected to the ground, You might even imagine that you are pressing the foot into the ground.  This helps to engage the fibers of the hamstrings at the top of the thigh, which as antagonists to the hip flexors, will aid in the release.

Saturday, September 1, 2012

Day 63- Easy Psoas Stretch


Easy Psoas Stretch
This exercise is intended to begin the process of opening up the front of the hips.  It is a great exercise for those of us who suffer from low back stiffness.  This exercise is also beneficial at the beginning of the day before our feet hit the floor.
To do this exercise you will need a mat.  Start by lying on your back and hug one knee to your chest by holding on to the back of the thigh.  Lengthen the other leg long beneath you. Continue breathing as you stay in this position.  As you exhale imagine that your leg is reaching further away from you, and as you inhale feel the breath expand the back of the ribcage.  Stay in this position for 5-10 breaths. Then hug both legs to your chest and continue on the other side by stretching the opposite leg long beneath you.  Keep your breath moving in and out of your lungs in a continuous manner.  Repeat twice on each side.
Things to think about
This is a recuperative exercise.  Keep breathing even if you don’t feel a stretch.  The inhale in the back of the ribcage will encourage the muscles at the base of your ribs to loosen and release for easier movement.

Wednesday, August 22, 2012

Day 53- Single Leg Bridge


This exercise adds additional challenge to the articulation of the spine and the strength in the hamstring. 
To do this exercise you will need a mat.  Start by lying on your back with your knees bent and your feet planted in the ground.  Exhale as you let one leg float up into the air to a tabletop position.  Then inhale as you rock your pelvis towards your tailbone and exhale as you roll your pelvis towards your belly button and lift your spine into the air one vertebra at a time.  Be sure to maintain the tabletop position in the leg throughout the entire movement.  At the top inhale into the chest and then exhale as you let all of the air out of your lungs lower the spine slowly to the ground one vertebra at a time
Things to think about:
As with any bridge, it is important to be aware of the role of the ribcage in segmental movement of the spine.  Make sure to exhale completely.  This will allow the ribcage to narrow so that you can find segmental movement through the vertebrae at the base of the ribs.
With this single leg bridge, as you are articulating through the joints of the spine be sure that you are maintaining equal weight on each side of the of the vertebrae.
Remember all of the fabulous images for the bridge.  Articulate your spine as if you are picking up a string of pearls one vertebra at a time.

Friday, August 17, 2012

Day 48- Pelvic Clocks on Slomo


This exercise is very similar to the previous post, but it adds the soft ball as a prop to increase the mobility in the lower spine.
To do this exercise you will need a mat and a soft ball.  Start by lying on your back with your knees bent and the bottom of your feet planted in the ground.  Lift your pelvis in the air so that you can fit the soft ball underneath it.  Then let your pelvis release into the ball.  Begin some small micro movements in the pelvis to feel the feedback from the ball.  Then begin rocking the pelvis between the belly button and the tailbone. Next practice rocking the pelvis from side to side, and finally allow a circular motion to happen as you rock your pelvis from your belly button to your hip to your tailbone to the other hip and finally back to the belly button.  Reverse directions and repeat several times. 
Things to think about
This variation of the pelvic clock will increase the mobility of the lumbar spine, but it is important to remember that while the movement may appear to be larger, the effort is similar to the previous exercise.
Remember you are rotating your pelvis around the heads of your femurs (thigh bones.) The pelvis is moving and the thigh bones are staying still.  To find this separation it is important to continue moving the pelvis with the myofascial connections of the pelvis and to find ease in the larger muscles of the legs.

Wednesday, August 15, 2012

Day 46-Pelvic Rocks on Slomo Ball


This exercise adds a prop to the pelvic rock of the previous post.  The soft ball allows the pelvis to be raised from the floor, which can add to the release in the muscles of the low back.
To do this exercise you will need a mat and a soft ball.  Start by lying on your back with the soft ball under the back of your pelvis.  Your knees are bent and your feet are flat on the ground.  As you inhale rock your pelvis towards your tailbone, and as you exhale engage your pelvic floor to rock your pelvis towards the belly button.  Allow the soft ball to move with the pelvis for increased spine mobility.
Things to think about
The soft ball aids in this variation on the pelvic rock so it may feel like a larger movement than the last post.  You still want to have your feet touch the floor lightly to avoid pushing, and it is also a great idea to revisit the image of the string lifting the tailbone away from the ground.

Tuesday, August 14, 2012

Day 45- Pelvic Rocks


This exercise is intended to introduce mobility to the lumbar spine. It also allows the body to find the relationship between engagement in the pelvic floor and release in the muscles of the low spine.
 
To do this exercise you will need a mat.  Start by lying on your back with your knees bent and your feet planted in the ground.  As you inhale rock your pelvis towards your tailbone, and then as you exhale engage the pelvic floor and gently rock your pelvis to your belly button.  Inhale as you rock your pelvis towards your tailbone and exhale as you rock your pelvis towards your belly button.  Keep repeating this movement with the breath and notice how your low spine releases.
 
Things to think about:
This is a small movement that is the initiation of many Pilates’ exercises and so learning to execute it correctly will be important to the progress of any Pilates practice. 
 
A common mistake is to “push” the pelvis towards the ground by pressing the feet into the ground and engaging the hamstrings and the gluteus maximus (glutes).  Initiating the pelvic rock in this way can interrupt the sequencing of the spine.  As you are doing this exercise imagine that your feet are light on the ground and the pelvis moves from the center not from the legs.
 
Imagery is a good way to create this movement.  As you are inhaling become very aware of the weight of your tailbone in the ground like an anchor, then as you exhale imagine that a string attached to the tailbone is gently lifting it out of the ground.  Inhale the tailbone is gently lowered onto the ground and exhale the string lifts it gently to the ceiling.

Monday, August 13, 2012

Day 44- Outer Thigh Press with Theraband


This exercise helps find the hip abductors and rotators that aid in pelvic stability.
 
To do this exercise you will need a theraband and a mat.  Start by lying on your back with your knees bent and your feet planted on the ground.  Wrap the theraband around your thighs just above your knees and tie a knot.  Begin inhaling as you imagine the back of your ribcage expanding, and then exhale as you engage your abdominals and pelvic floor.  Once this has happened then gently press out on the theraband equally with both legs.  Then as you inhale allow your legs to release to a neutral position.  Repeat 8-10 times
 
Things to think about:
It is important to keep the bottom of your feet on the ground without rolling to the sides of the feet. 
 
Keep your pelvis as still as possible, this exercise is about isolating the movement of your legs from the movement of your pelvis.

As always remember to exhale all of the air out as you engage your abdominals

Sunday, August 12, 2012

Day 43- Inner Thigh Squeeze on Slomo Ball


This exercise adds inner thigh strength to pelvic floor and low abdominal engagement with the breath.
To do this exercise you will need a soft ball and a mat.  Start by lying on your back with your knees bent and your feet planted on the ground.  Put the soft ball between your knees.  As you inhale expand the belly and the ribs. Then, as you exhale allow the ribs to narrow, your belly to hollow and then squeeze the ball as you engage your abdominals and pelvic floor.  Release the ball as you inhale and then exhale and begin the process again.  Repeat 8-10 times
Things to think about:
I like to call the inner thighs the gateway to the pelvic floor.  As you are exhaling and squeezing the ball use the inner thigh work to help you find the lift in the pelvic floor.

Saturday, August 11, 2012

Day 42- Breath with Abdominal and Pelvic Floor Engagement


This exercise is intended to take your awareness to the deep abdominals and the pelvic floor.  It is taking all the breath exercises to the next step.  In Pilates the breath is the place to start and then the place to go is the pelvic floor and abdominal engagement.
To do this exercise you will need a mat.  Start by lying on your back with your knees bent and your feet flat on the ground.  Begin inhaling using the diaphragmatic breath from earlier in the blog.  Then as you exhale notice the hollowing in the abdomen.  Inhale again and on the next exhale use your muscles to continue this hollowing into abdominal engagement.  Use your muscles to help the breath.  Continue this breath and with every exhale help your abdominals engage as your diaphragm releases.
Things to think about:
This is an exercise that begs for imagery.  As you are practicing this breath try these on for size.
As you exhale imaging drawing your tailbone to your pubic bone
As you exhale feel your bellybutton smile
As you exhale reach your head away from your tail.
Remember that releasing all of the air will make this abdominal engagement much easier.

Friday, August 10, 2012

Day 41- Breath for Energy


This exercise is a rib breath with the added awareness of the sympathetic nervous system.  This is the branch of the nervous system that is often dubbed the fight or flight nervous system.  It gives us our “get up and go.”
To do this exercise you will need a mat.  Start by lying on your back with your knees bent and your feet flat on the ground.  As you inhale start counting and let the breath expand your ribs.  Count to six and then begin to exhale. Continue counting and then inhale when you have reached a count of seven.  Continue breathing in this way as long as you want. 
Things to think about
This exercise is intended to give you energy.  It helps to have energetic images in your head as you practice this enlivening breath. 
This is a great exercise for that time in the afternoon when it seems like five o’clock will never ever come.

Thursday, August 9, 2012

Day 40- Breath for Rest


This exercise is intended to help you practice using your breath to relax your body.  It is a way to be mindful and to relieve stress
To do this exercise you will need a mat. Start by lying on your back with your knees bent and your feet planted in the ground.  Place your hands on your belly and begin to inhale.  As you inhale count to six, and then begin your exhale, as you exhale count to seven.  Continue this breath pattern as long as you choose.  As you are breathing take your minds eye to parts of your body that might be holding tension.  Gently ask with your breath for these parts of your body to release that tension into the floor.  This is a diaphragmatic breath that goes a little deeper.  
Things to think about
Allowing images to pass through your mind can be helpful in this resting position.  It is also helpful to prop your feet and lower legs on a large exercise ball too.
This breath stimulates the parasympathetic nervous system to allow for rest and relaxation.  It is a great breath exercise to do right before sleeping.

Wednesday, August 8, 2012

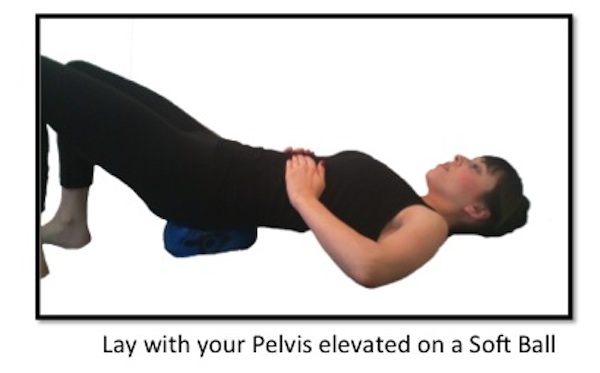
Day 39- Chest Breath with Pelvis on Soft Ball


This exercise places the pelvis in an elevated position and allows for increase length in the entire spine.
To do this exercise you will need a soft ball and a mat.  Start by lying supine with the soft ball under your sacrum, which elevates your pelvis away from the ground.  Your head and shoulders will be on the ground and your knees will be bent with your feet flat on the floor.  Begin the chest breath.  As you inhale allow the breastbone to rise towards your chest and as you exhale let the breastbone release towards your spine.  With each inhale imagine a string lifting your breastbone to the ceiling and with each exhale imagine the breastbone melting into a pool on the ground
Things to think about
As before this exercise is one of the easiest ways to release tension in the neck and shoulders.  Using imagery to increase this release is also helpful.  Imagine your breastbone, melting or softening to increase the mobility in your chest as well as in your thoracic and cervical spine.

Monday, August 6, 2012

Day 37- Belly Breath with Pelvis on Soft Ball


This exercise allows you to continue practicing the belly breath with the pelvis elevated.  This will allow you to concentrate on finding length in the lower back during this breath.

To do this exercise you will need a soft ball and a mat.  Start by lying on your back with the soft ball under your sacrum, which elevates your pelvis away from the ground.  Your head and shoulders will be on the ground and your knees will be bent with your feet flat on the floor.  Begin the diaphragmatic breath, allowing your belly to rise as you inhale and release as you exhale.  As you continue the breath see if you can expand the tissues of your low spine when you inhale, and as you exhale make sure you expel all of the air so that your ribcage can release towards the ground for a gentle stretch.

Things to think about
 The diaphragmatic breath is a great way to release tension in the top of the Psoas muscle, which runs along the front of the low spine.  As you exhale and the diaphragm releases into the ribcage this is a great time to think about reaching your ribcage to the ground to increase the length in your lower spine.

Sunday, August 5, 2012

Day 36-Single Lung Breathing Side Lying


This exercise adds the resistance of the floor to the single lung breath exercise of before.  Breathing into resistance whether it is the hands or the floor can increase the depth of the breath once the resistance is released.  It can also assist you in your exhale.
To do this exercise you will need a mat.  Start by lying on your side with your knees bent.  Begin breathing into your ribs.  As you inhale try to expand your ribs into the floor.  Exhale as your ribs narrow and move away from the floor. Inhale your ribs expand into the floor and exhale as they release. Repeat on the other side.
Things to think about
In between the two different sides of this exercise it will be fun for you to lay on your back and try a few rib breaths to notice the difference from side to side.  Ask yourself if your ribs have more mobility.  Can you take deeper breaths?