Showing posts with label abdominal workout. Show all posts

Friday, April 12, 2013

Day 286- Side Lying Ankle Circles with Magic Circle


This exercise continues our work maintaining the stability of the pelvis.  This time we are working on increasing ankle mobility too.

To do this exercise you will need a matt and a magic circle.  Start by lying on your side with your ankles threaded through the center of the magic circle.  The ankle on the bottom will hold the magic circle and the ankle that is on the top will lift and press into the top of the magic circle.  Maintain the pressure on the magic circle as you inhale and begin circling the ankle.  Exhale as you focus on the length of your spine while continuing to press your ankle up into the top of the circle and circling your ankle.  Repeat in the other direction.

Things to think about
As you are feeling the different parts of the ankle circle, notice if you can feel different myofascial connections being engaged and released.  This exercise is a great way to connect all of the parts of the pelvis to all of the parts of the ankles

Take this opportunity to also stretch the fascia of the bottom of your feet.  Spread your toes out as far as you can.

Thursday, April 4, 2013

Day 278- Side Kicks with Bottom Leg Lifted


This exercise progresses the classic Pilates Side kick by decreasing the base of support.

To do this exercise you will need a mat.  Start by lying on your side with your head, ribs,  hips, and heels lined up.  Inhale into the back of the ribs and then exhale as you reach through your heels and lift both legs.  Inhale as you lift the top leg six inches higher, and then exhale as you kick the top leg back and inhale as you kick the top leg forward.  Repeat 8-10 times.

Things to think about
Maintaining axial length is even more challenging with this exercise because you don’t have the support of the lower leg.  As you are exhaling be sure that you are getting all of the air out of your lungs to keep the ribcage connected to the pelvis.  This will increase pelvic stability and put freedom in the hip socket.

If you want to add even more challenge to this very challenging exercise, reach one arm up to the ceiling. 

Thursday, March 21, 2013

Day 264- Pull Ups on Ball


This exercise adds a proprioceptive challenge as the body is moving in and out of spine flexion.

To do this exercise you will need a mat and a large physioball.  Start by bearing weight on your hands with your shins on the large ball.  Inhale to prepare and then exhale as you bend your knees and lift your belly to bend your spine.  This will bring your knees underneath you.  Inhale as you lengthen your legs away from you, and then exhale as you repeat. 

Things to think about
Think of this exercise as a much more challenging version of the cat/cow in a quadruped position.  To the flexion of the spine we are simply adding movement of the lower legs. 

Make sure you remember that your head is technically part of your spine in the alignment sense.  When you are bending your spine, you are also dropping the crown of your head to the ground.

Saturday, March 16, 2013

Day 259- Leg Pull Front


This exercise is a Pilates Classic that adds some movement to the plank.

To do this exercise you will need a mat.  Start in a quadruped position.  Inhale to prepare and then exhale as you lengthen one leg and then the other behind you into a plank position.  Inhale at this point and then exhale as you lift one leg into the air.  Inhale again to replace the leg and exhale as you lift the other leg into the air.  Repeat 8-10 times on alternating sides.

Things to think about
The Plank and any subsequent exercises rely largely on support for the spine.  If you lose the length of the spine when the legs lift you will be placing your back in danger.

As you exhale imagine that your head is reaching even farther away from your heel.  You are lengthening your leg away from the body.

Thursday, March 14, 2013

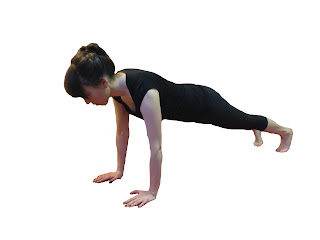
Day 257- Plank


This exercise is a classic core exercise that is also pretty trendy right now. 

To do this exercise you will need a mat.  Start in Quadruped position with your hands directly beneath your shoulders and your knees directly beneath your hips.  Inhale to prepare and then exhale as you reach one leg on the floor beneath you and curl your toes underneath so that the foot can bear weight.  Inhale in this position and then exhale as you reach the other leg long beneath you.  Hold this plank for ten breaths, and if your feel really strong try to hold it for twenty five breaths.

Things to think about
The breath in this exercise is what will keep the static position moving.  No matter how much you shake or shiver, be sure that you are breathing.  Inhale and Exhale is a great mantra for the plank.

Like I said in yesterday’s post.  Length, Length, Length, and more and more length.  How long is your spine?  Can you make it longer in the plank?

Wednesday, March 13, 2013

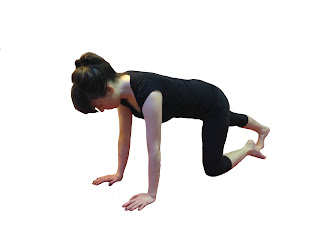
Day 256- Quadruped Walking to Plank


This exercise helps the body learn the best way to find a plank that is balanced from front to back.

To do this exercise you will need a mat.  Start in Quadruped position with your hands directly beneath your shoulders and your knees directly beneath your hips.  Inhale to prepare and then exhale as you reach one leg along the floor beneath you and curl your toes underneath so that the foot can bear weight.  Inhale in this position and then exhale as you reach the other leg long beneath you.  Inhale as your replace one knee and then the other.  Repeat 8-10 alternating legs that start the motion.

Things to think about
Length, Length, Length and more and more length!  How long can you make your spine?  How long can you make the front of your hips?  How far can you reach your heels away from your tail? These are all questions that will help the plank.

Feel free to make fists with your hands if this exercise hurts your wrists.

Wednesday, February 27, 2013

Day 242- Scarecrow with Arms, Elbows, Upper Body and then Legs


This exercise is an advanced version of the scarecrow that can strengthen all of the myofascial connections of back of the body.

To do this exercise you will need a mat.  Start by lying on your belly with your legs lengthened long beneath you.  Place your elbows to the side of the body directly in line with your shoulders and allow your forearms to be placed at a right angle to the elbows.  Inhale as you press your elbows into the ground to lift your forearms and then exhale as you maintain the angles of your forearms and lift your elbows.  Inhale again as you reach the head away from the tail and lift your head, neck, and shoulders while also reaching the bottoms of your legs away from you.  Exhale as you maintain spine extension and allow the feet to float into the air.  And finally inhale as you release to the floor.

Things to think about
This exercise is about endurance and functional strength of the postural muscles of the spine.  As you extend the spine imagine making a long arc with your body.  Imagine lifting two ends of a jump rope rather than folding a piece of paper in half

After doing this exercise find your way to sitting and enjoy your long and beautiful posture.

Tuesday, February 5, 2013

Day 220- Swimming


This exercise is the Classic Pilates exercise which is intended to strengthen the opposing fascial connections on the back of the body.
To do this exercise you will need a mat.  Start by lying on your belly with your legs long beneath you and your arms reaching long above your head.  Inhale as you allow your upper spine, arms, and legs up into the air.  Using a continuous breath and being sure that your abdomen is hollow allow your left leg and right arm to lift two inches higher.  Then switch to your right leg and left arm. Continue alternating the arms and legs while maintaining a stable and long spine.  When you are ready- allow your body to melt to the ground.
Things to think about
Be sure that your shoulder blades are sliding down your back as you do this exercise. 
Imagine that the left pinky finger is connected to the right pinky toe and vice versa.  This will allow you to find the fascial connections across your back that aid in spinal rotation and rotational sports.

Monday, February 4, 2013

Day 219- Pre Swimming Arms


This exercise is a preparation for the upper body to do the Classic Pilates Swimming exercise.
To do this exercise you will need a mat.  Start by lying on your belly with your legs long beneath you and your arms reaching long along the floor beyond your head.  Exhale as you hollow your abdomen and then inhale as you reach your head away from your tail and then lift your head, neck, and shoulders in spine extension.  Then continue breathing as you lift one arm higher and then the other. Continue alternating the arms for 10 cycles, and then exhale as you release your spine to the floor.
Things to think about
Often this exercise is challenging on the shoulders.  Feel free to widen the arms if you feel any impingement on your shoulders.  Also be sure that you are sliding your shoulder blades away from your hands.
As you are extending your upper spine be sure that the front of your hips are open, and reach your big toes away from your tailbone. All of this will allow you to find the longest possible spine.

Friday, February 1, 2013

Day 216- Full Teaser


This exercise is the classic Pilates Teaser.  It puts all of the elements that we have been working on together!  Happy February!
To do this exercise you will need a mat.  Start by lying on your back with your legs lengthened long beneath you.  Inhale as you raise your hands above your shoulders pointing your fingers towards the ceiling.  Exhale as you begin to reach your arms across the room, then continue to exhale as you narrow your ribcage and lift your head, neck, and shoulders.  Once your ribcage is pressed into the ground rock your pelvis towards your belly button so that your legs will float up into the air.  Continue rolling through your spine until your spine and your legs make a vee position.  Inhale at the top and then curl your spine towards the floor vertebra by vertebra.  Once your low spine connects to the floor lower your legs to the floor, and finally allow your head, neck, and shoulders to release to the floor.  Repeat 6-8 times.
Things to think about
If you have osteoporosis this is not the exercise for you, but you can always visit The Pilates Studio’s YouTube Channel to watch all of the osteoporosis friendly workouts.
It is very challenging to find the spine articulation in this exercise.  Be sure to press your ribcage into the ground first and then find your deep low abdominals to protect the back as you lift your legs.

Thursday, January 31, 2013

Day 215- Teaser with Resistance Band Arm Work


This exercise adds resistance training to the upper body in the modified teaser position.

To do this exercise you will need a mat and a theraband.  Start by lying on your back in a tabletop position with your hands holding the theraband in the air above your chest.  Inhale to prepare and then exhale as you pull out on the theraband and lift your head, neck, and shoulders into the air.  Continue the exhale as you keep rolling through the spine and pulling horizontally on the theraband.  At the top inhale to prepare and then exhale as you pull on the theraband and lift your arms overhead.  Inhale as you return your arms to the front and repeat 6-8 times.  Then inhale to prepare and exhale to roll back to the earth.

Things to think about
If you have osteoporosis, you can still do the arm work in the modified vee position without rolling through the spine.

This exercise helps organize the head, neck, and shoulders.  Be sure to allow the shoulder blades to slide down the back as you lift the arms overhead.

Tuesday, January 29, 2013

Day 213- Teaser Starting at Table Top Moving to Full Vee with Leg Lowers


This exercise is a variation on the teaser prep.  It adds an endurance component to the lower abdominals

To do this exercise you will need a mat.  Start by lying on your back with your legs in a tabletop position.  Inhale as you reach your fingertips to the ceiling and then exhale as you lift your head, neck, and shoulders.  Continue exhaling as you roll through the spine and straighten your legs to find a vee position.  Inhale here and then exhale as you lower your legs towards the ground 4 inches and then lift them again.  Repeat this 4 times, and then inhale in the vee position and exhale as you roll through the spine and bend your knees.  Repeat the entire series 3 times.

Things to think about
If you have osteoporosis, do this exercise by staying in the vee position and completing the leg lift and lowers.

The abdominal work as you lower your legs is quite challenging. Be sure that you are exhaling and concentrating on hollowing the abdominals as you lower the legs. 

Monday, January 28, 2013

Day 212- Teaser Starting at Table Top and Moving to Full Vee


This exercise is still another preparation for the full teaser, but we are getting to the point in which the legs do straighten. YAY!  Each step is a good one

To do this exercise you will need a mat.  Start by lying on your back with your feet in a tabletop position.  Inhale into the back of your ribs.  Then exhale as you reach your hands towards your knees and lift your head neck and shoulders.  Continue exhaling as you finish rolling through your spine and straighten your legs.  Inhale at the top and then exhale as you bend your knees and roll through each vertebra to get back to the ground.

Things to think about
If you have osteoporosis, try this exercise from a seated position.  Find the tabletop Vee and then straighten your legs.  Repeat this movement six-eight times.

There are a lot of magic spots in this exercise.  It is important to get the head, neck, and shoulders in the air before you straighten the legs.  On the way down it is important to get the sacrum to the ground before you bend your knees.

Sunday, January 27, 2013

Day 211- Teaser Starting and Staying in Table Top


This exercise is also a preparation for the classic version of the Pilates Teaser.  You might notice that there are a lot of teaser prep exercises.  That’s because the teaser is hard.

To do this exercise you will need a mat.  Start by lying on your back in a tabletop position.  Inhale as you reach your arms towards the ceiling and then exhale as you narrow your ribcage and lift your head, neck, and shoulders.  Continue exhaling as you finished rolling through your spine to a balanced seated position with your legs in tabletop and your fingertips reaching just past your knees.  At this point, inhale into the back of your ribcage and then exhale as your roll your spine back to the floor vertebra by vertebra.  Repeat 8-10 times.
 Things to think about
If you have osteoporosis, refer to the PilatesStudioHD on youtube.  We have an entire section of videos that are osteoporosis friendly.

The challenge to this exercise is to maintain the tabletop position.  As the abdominal work gets a little harder the likelihood that your legs will kick involuntarily is greater.  This is a clue that you haven’t found your deepest abdominals.  Try to sit tall and move each vertebra individually. 

Saturday, January 26, 2013

Day 210- Teaser Prep


This exercise is intended to prepare you to find the positions that will be necessary to complete the classic Pilates exercise the teaser.

To do this exercise you will need a mat.  Start by lying on your back with your knees bent and your feet planted on the floor.  Inhale to prepare and then exhale as you roll through your spine and roll up to sitting.  Once in a sitting position rock back towards your tailbone slightly and then let one leg and the other to float into the air.  Once you have lifted both legs, then exhale and hollow your abdomen as you straighten both legs.  Inhale as you bend and exhale as you straighten.  Repeat 8-10 times before rolling back down.

Things to think about
If you have osteoporosis, don’t worry about rolling through the spine.  Simply sit towards your tailbone and straighten and bend your legs.

It is important to protect your back by finding an abdominal connection. As you straighten your legs imagine hollowing your abdominals as if you are stretching a rubber band between your bellybutton and your heels.

Friday, January 25, 2013

Day 209- Neck Pull with Dowel behind head


This exercise is intended to make the neck pull even more challenging have fun

To do this exercise you will need a mat and a dowel.  Start lying on your back, and thread the dowel in front of your forearms and behind the base of your skull.  Inhale into the back of the ribcage and then exhale as you begin peeling the spine away from the floor to a seated position. Inhale into the back again and exhale as you lay the spine back down on the floor one vertebra at a time.

Things to think about
If you have osteoporosis you can do this exercise starting from a seated position and hinge back in a neutral spine.

This exercise is hard.  Be sure to not allow the dowel to push your neck forward.  Let your head settle back into the dowel. 

Don’t try this exercise until you can do the neck pull.

Thursday, January 24, 2013

Day 208- Neck Pull in 3 Breaths


This exercise makes the advanced exercise of the neck pull even harder. (If you can imagine)

To do this exercise you will need a mat.  Start lying on your back with your legs long beneath you and your hands clasped behind your head.  Inhale into the back of the ribs and exhale as you lift your head, neck, and shoulders into the air.  Inhale here and then exhale as you roll up so that only the low back is on the ground.  Inhale one more time and then exhale as you complete the movement to sitting.  Take three breaths to return to the floor and then repeat 3-5 times.

Things to think about
If you have osteoporosis you can start this exercise in a sitting position.  Hinge back in a neutral spine and take three breaths and then return to sitting.

Often in the Neck Pull people get stuck at the ribcage.  When you take the second breath be sure to get all of the air out of your lungs which will lengthen the spine at the ribcage.
  

Wednesday, January 23, 2013

Day 207- Neck Pull


This exercise is a classic pilates exercise that is intended to be and advanced version of the roll up.

To do this exercise you will need a mat.  Start by lying on your back with your legs longs beneath you and your hands clasped behind your head.  Inhale to prepare and then exhale as you narrow your ribcage to begin lifting your head, neck, and shoulders.  Continue exhaling as you continue rolling through your spine to come to sitting.  Inhale at the top and exhale as you roll back down through each individual vertebra.

Things to think about
If you have osteoporosis this exercise can be done with a neutral spine, or you can check out The Pilates Studio’s Youtube channel for an entire group of Osteoporosis friendly workouts.

The elbows in this exercise should be sticking out to the side of your head.  They will try to come forward as you roll up and back down.  To get the maximum strength training work hard to keep them at the side of the body.

Monday, January 21, 2013

Day 205- Roll up with Resistance Band in Hands- Arms by Ears.


This exercise is intended to increase the challenge of the roll up.  The theraband helps organize the shoulder, and keeping the arms by the ears challenges the spinal articulation

To do this exercise you will need a mat and a theraband.  Start by lying on your back with your legs long beneath you and your arms on the ground behind your head with the theraband stretched between your hands.  Inhale into the back of your ribcage, and exhale as you lift your head, neck, shoulders, and arms towards the ceiling, and then continue the exhale as you roll through the spine vertebra by vertebra reaching the head, neck, shoulders, and arms towards the ceiling.

Things to think about
If you have osteoporosis try this exercise by starting in a sitting position, and then hinge with a neutral spine towards the ground behind you. 

Pulling outward on the theraband helps organize the shoulders so that you can find the articulation in the spine. 

No matter how much you try your arms are going to get ahead of you.  Try as much as you can to keep them reaching towards the ceiling.

Friday, January 18, 2013

Day 202- Roll Up with Arms at Ears


This exercise adds great challenge to the Classic Pilates Roll up by adding length to the lever arm of the exercise.
To do this exercise you will need a mat.  Start by lying on your back with your legs lengthened long beneath you and your arms lengthened along the ground behind your head.  Inhale into the back of your ribs and then exhale as you narrow your ribcage and lift your head, neck, and shoulders keeping your arms lengthened next to your ears and reaching towards the ceiling.  Continue exhaling as you continue to roll through the spine.  Inhale at the top and then exhale as you roll back down still maintaining the arms next to the ears. Repeat 6-8 times.
Things to think about
If you have osteoporosis, you can do this exercise by starting in a seated position.  Reach your arms towards the ceiling as you hinge backwards about eight inches and then make your spine longer as you come back up.
This is a very challenging exercise.  The first time you try it you might find that you get stuck and your arms sneak forward of your ears.  Try to keep your arms right neck to your ears with your shoulder blades sliding down your back.